
You probably opened this because Ctrl+F has turned into part of your job.
A workbook lands in your inbox every week. You search for a project name, a client ID, or a status like “Overdue,” then copy matches into a report, highlight a few exceptions, and hope you didn't miss one buried in the sheet. The work isn't difficult. It's repetitive, easy to get wrong, and hard to justify doing by hand more than once.
That's where Excel VBA Find earns its keep. Used well, it turns a manual search into a reusable procedure that can scan a real working range, return live cells you can act on, and feed reporting, cleanup, and review tasks without the usual copy-paste risk. If your next step after finding something is “highlight it,” “update the cell next to it,” “copy the whole row,” or “send the result somewhere else,” you're already in VBA territory. If your workflow eventually hands results to something like this auto email from Excel guide, Find often becomes the first building block.
Non-technical teams are also getting more comfortable using AI to write and refine macros, which makes practical VBA much more accessible than it used to be. If you want structured help with that angle, this Excel productivity with Copilot automation course is one useful resource for turning spreadsheet work into repeatable systems.
Stop Searching Manually Start Automating with VBA
The usual pattern looks harmless at first. A manager wants every transaction tied to a project code. You open the workbook, run Ctrl+F, step through matches, and move the relevant rows into a summary tab. By itself, that's manageable.
The problem starts when it becomes routine. Monday's search becomes Tuesday's exception check, then Friday's cleanup pass, then month-end reconciliation. At that point, manual search isn't just slow. It's fragile.
Excel VBA Find changes the job from “locate text” to “locate and act.” That distinction matters. In workbook automation, the useful outcome is rarely the match itself. It's what you do next with the matching cell.
What Find replaces
In practical reporting work, Find usually replaces a chain like this:
- Search manually: You type a term into Ctrl+F and jump through results one by one.
- Inspect context: You check nearby columns to decide whether the hit matters.
- Take action: You copy a row, recolor a cell, update a status, or flag an exception.
- Repeat until tired: Then you do it again next week.
A macro can do the same sequence without drift. It will search the same range, use the same match rules, and apply the same action every time.
Practical rule: If you perform the same search more than once, it's usually worth turning that search into code.
The biggest mental shift is this: Excel VBA Find isn't just a search box in code form. It becomes the control point for report generation, data cleanup, audit checks, and exception handling. That's why experienced analysts keep coming back to it. Not because the method itself is complicated, but because it plugs directly into the rest of the Excel object model.
For non-technical professionals, that's the sweet spot. You don't need to become a software engineer to get value from it. You need one reliable pattern that finds the right cells and a clear next action for each one.
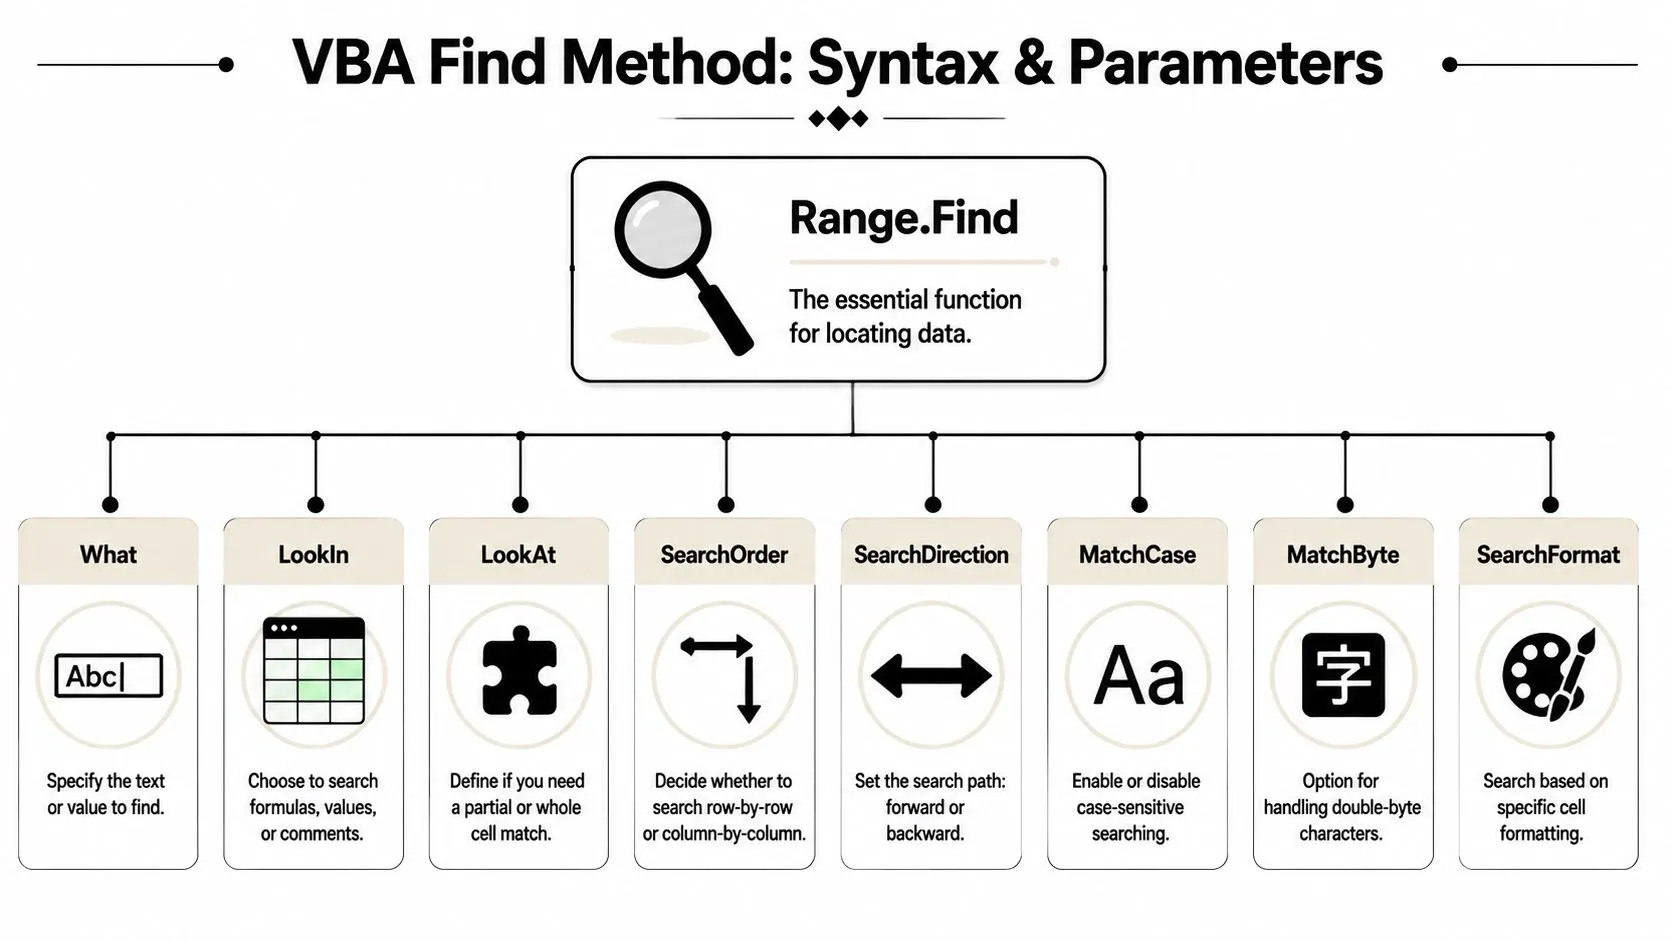
The Core VBA Find Method Syntax and Parameters
Microsoft documents Range.Find as a method that returns a Range object representing the first matching cell, and its signature includes eight optional search controls: After, LookIn, LookAt, SearchOrder, SearchDirection, MatchCase, MatchByte, and SearchFormat in the official Range.Find documentation. That design is why Find sits at the center of many lookup and cleanup macros instead of being just a thin wrapper around Ctrl+F.
Why Find matters in real workbooks
The key thing to understand is what Find returns. It returns a Range object, not a text value. That means the result is a live cell you can inspect, edit, format, offset from, or use as an anchor to pull related data.
That's why this method is so useful in business automation. Once you've found a cell containing a project code in column A, you can immediately read the invoice amount in column D, write a flag into column F, or copy the whole row to another sheet.
Here's the basic shape:
Set foundCell = searchRange.Find(What:=valueToFind, ...)
And here are the parameters you'll use most often.
| Parameter | Purpose | Common Values |
|---|---|---|
What | The value or text to search for | "Project Phoenix", "Overdue", 12345 |
LookIn | Where Excel should search | xlValues, xlFormulas, comments |
LookAt | Whole-cell or partial match | xlWhole, xlPart |
SearchOrder | Search across rows or columns first | xlByRows, xlByColumns |
SearchDirection | Forward or backward search path | xlNext, xlPrevious |
MatchCase | Whether uppercase/lowercase must match | True, False |
MatchByte | Double-byte character handling | True, False |
SearchFormat | Search using formatting criteria | True, False |
A first run example
This is the first version I'd give to someone who wants a usable macro today, not a theory lesson.
Sub FindFirstMatch()

    Dim ws As Worksheet
    Dim searchRange As Range
    Dim foundCell As Range

    Set ws = ThisWorkbook.Worksheets("Data")
    Set searchRange = ws.Range("A2:A500")

    Set foundCell = searchRange.Find( _
        What:="Project Phoenix", _
        After:=searchRange.Cells(searchRange.Cells.Count), _
        LookIn:=xlValues, _
        LookAt:=xlWhole, _
        SearchOrder:=xlByRows, _
        SearchDirection:=xlNext, _
        MatchCase:=False, _
        MatchByte:=False, _
        SearchFormat:=False)

    If Not foundCell Is Nothing Then
        MsgBox "Found in " & foundCell.Address
        foundCell.Interior.Color = vbYellow
    Else
        MsgBox "No match found."
    End If

End Sub
A few details in that code matter more than they look.
- Bound the range:
A2:A500is better than searching the whole sheet when you already know where the data lives. - Use
Set: Because the result is a Range object, assign it withSet. - Check for
Nothing: If no match exists, trying to usefoundCell.Addresswill fail. - Pass the parameters explicitly: You want this macro to behave the same way every time.
The fastest way to make Find unreliable is to let Excel guess what you meant.
A lot of beginner examples leave out most arguments because the code looks shorter. That's fine for a demo. It's not fine for a workbook other people depend on.
Finding All Matches with the FindNext Loop
Finding the first hit is useful for spot checks. It isn't enough for recurring reporting. If “Project Phoenix” appears in multiple rows, a single Find call gives you only the first one. That's where FindNext becomes the pattern that powers reusable automation.
A well-known practical rule in Excel VBA is that Range.Find is stateful, and several arguments such as LookIn, LookAt, SearchOrder, and MatchByte are remembered from the previous search unless you set them explicitly. The standard workflow is to call .Find once, then loop with .FindNext until the address repeats, as described in this practical guide to VBA Range Find behavior.

If you use AI to draft macros, this is also the point where good prompts matter. A lot of generated code finds only the first match and stops. Resources like these ChatGPT prompts for Excel macros can help you ask for the full Find and FindNext pattern instead of a one-cell demo.
The loop pattern that holds up
The reliable sequence is simple:
- Define the search range.
- Run
Findonce. - Exit cleanly if nothing was found.
- Store the first address.
- Process the current match.
- Use
FindNextto move on. - Stop when the address repeats.
That repeated-address check is the stop condition that keeps the loop from circling forever.
Common mistake: People expect
Findto return all matches. It won't. It returns one matching cell at a time.
The other trap is the After argument. The search starts after that cell, not at that cell. That behavior is useful once you understand it, but it causes off-by-one confusion when people pick the wrong starting point.
A production-safe example
This example highlights every cell in column A that contains the text “Project Phoenix”.
Sub HighlightAllMatches()

    Dim ws As Worksheet
    Dim searchRange As Range
    Dim foundCell As Range
    Dim firstAddress As String

    Set ws = ThisWorkbook.Worksheets("Data")
    Set searchRange = ws.Range("A2:A500")

    Set foundCell = searchRange.Find( _
        What:="Project Phoenix", _
        After:=searchRange.Cells(searchRange.Cells.Count), _
        LookIn:=xlValues, _
        LookAt:=xlWhole, _
        SearchOrder:=xlByRows, _
        SearchDirection:=xlNext, _
        MatchCase:=False, _
        MatchByte:=False, _
        SearchFormat:=False)

    If foundCell Is Nothing Then Exit Sub

    firstAddress = foundCell.Address

    Do
        foundCell.Interior.Color = vbYellow

        Set foundCell = searchRange.FindNext(foundCell)

    Loop While Not foundCell Is Nothing And foundCell.Address <> firstAddress

End Sub
This works because it handles three conditions properly:
- No match exists: The
If foundCell Is Nothing Then Exit Subguard prevents a crash. - Multiple matches exist: The loop processes each one in turn.
- The search wraps: The
firstAddresscheck stops the loop at the right moment.
Here's where this pattern pays off in actual office work:
- Status review: Find every “Overdue” row and color it.
- Client reporting: Find all entries for one client ID and move them to a summary sheet.
- Formula audit: Find cells containing a formula pattern and inspect the logic around them.
- Cleanup passes: Find legacy labels and replace or standardize them.
That's the point where Excel VBA Find stops being a convenience method and starts becoming infrastructure for your workbook.
Advanced Find Techniques with Wildcards and Search Settings
The basic exact-match search handles clean data. Real workbooks rarely stay clean.
Customer names get entered with extra text. Product codes share prefixes. Comments contain the same issue in slightly different wording. In such scenarios, Excel VBA Find becomes much more useful than a one-off lookup, because the returned cell is still something you can act on after a looser search.
A practical teaching example shows Find being used as part of an object-oriented workflow where the result is a live cell object, not just a displayed result. It also notes that VBA Find can search formulas and comments, which makes it useful for auditing and targeted remediation in large workbooks, as shown in this Excel VBA Find walkthrough on YouTube.

Wildcards for messy business data
Suppose a product family starts with XF-, but the trailing characters vary by item. You don't want to search each code one by one. You want one search rule.
In VBA Find, * stands for multiple characters and ? stands for a single character. Combined with LookAt:=xlWhole or xlPart, that gives you flexible matching without writing a more complex parser.
Set foundCell = searchRange.Find( _
    What:="XF-*", _
    After:=searchRange.Cells(searchRange.Cells.Count), _
    LookIn:=xlValues, _
    LookAt:=xlWhole, _
    SearchOrder:=xlByRows, _
    SearchDirection:=xlNext, _
    MatchCase:=False, _
    MatchByte:=False, _
    SearchFormat:=False)
This is often enough for business cleanup. If your pattern rules are more complex than wildcard matching, it helps to test those patterns outside Excel first. A tool like this guide on using a regex tester can help you sanity-check pattern logic before you decide whether Find is sufficient or whether you need a regex-based VBA approach instead.
Wildcards solve a lot of spreadsheet mess without forcing users into more advanced text-processing code.
Search settings that change behavior
Two settings deserve more attention than they usually get.
First, LookAt.
If you search for Phoenix with xlWhole, Excel only matches cells whose full content is exactly Phoenix. With xlPart, it will also match Project Phoenix or Phoenix - Approved.
Second, SearchOrder.
Most tabular reports are easier to scan row by row, so xlByRows is the default choice in many macros. But some audit routines are cleaner with xlByColumns, especially when each column represents a different field to validate before moving to the next.
A few examples:
- Name cleanup: Use
xlPartwhen names include prefixes or suffixes you can't control. - Formula inspection: Use
LookIn:=xlFormulaswhen you need to find formulas containing a particular reference. - Comment review: Search in comments when issue notes or reviewer remarks live outside visible cell values.
- Column-led audits: Use
xlByColumnswhen you're validating one field across a report before moving to the next field.
These settings don't just change what gets found. They change how predictable your automation feels when someone else runs it next month.
Real-World Automation Recipes You Can Use Today
Most Excel VBA Find tutorials stop at “here's how to locate a word.” That's not where the useful work starts. The practical value shows up when the search result feeds a business task like reviewing statuses, extracting records, or updating a process tracker.
That matters because many users want Find for data quality checks and exception handling, not only for simple lookups. One independent tutorial on finding missing numbers in a range using VBA highlights that gap by showing a missing-integer use case and noting the setup constraints around bounds and output handling. The broader lesson is clear. Find is well suited to auditing messy datasets when you build the workflow around it.
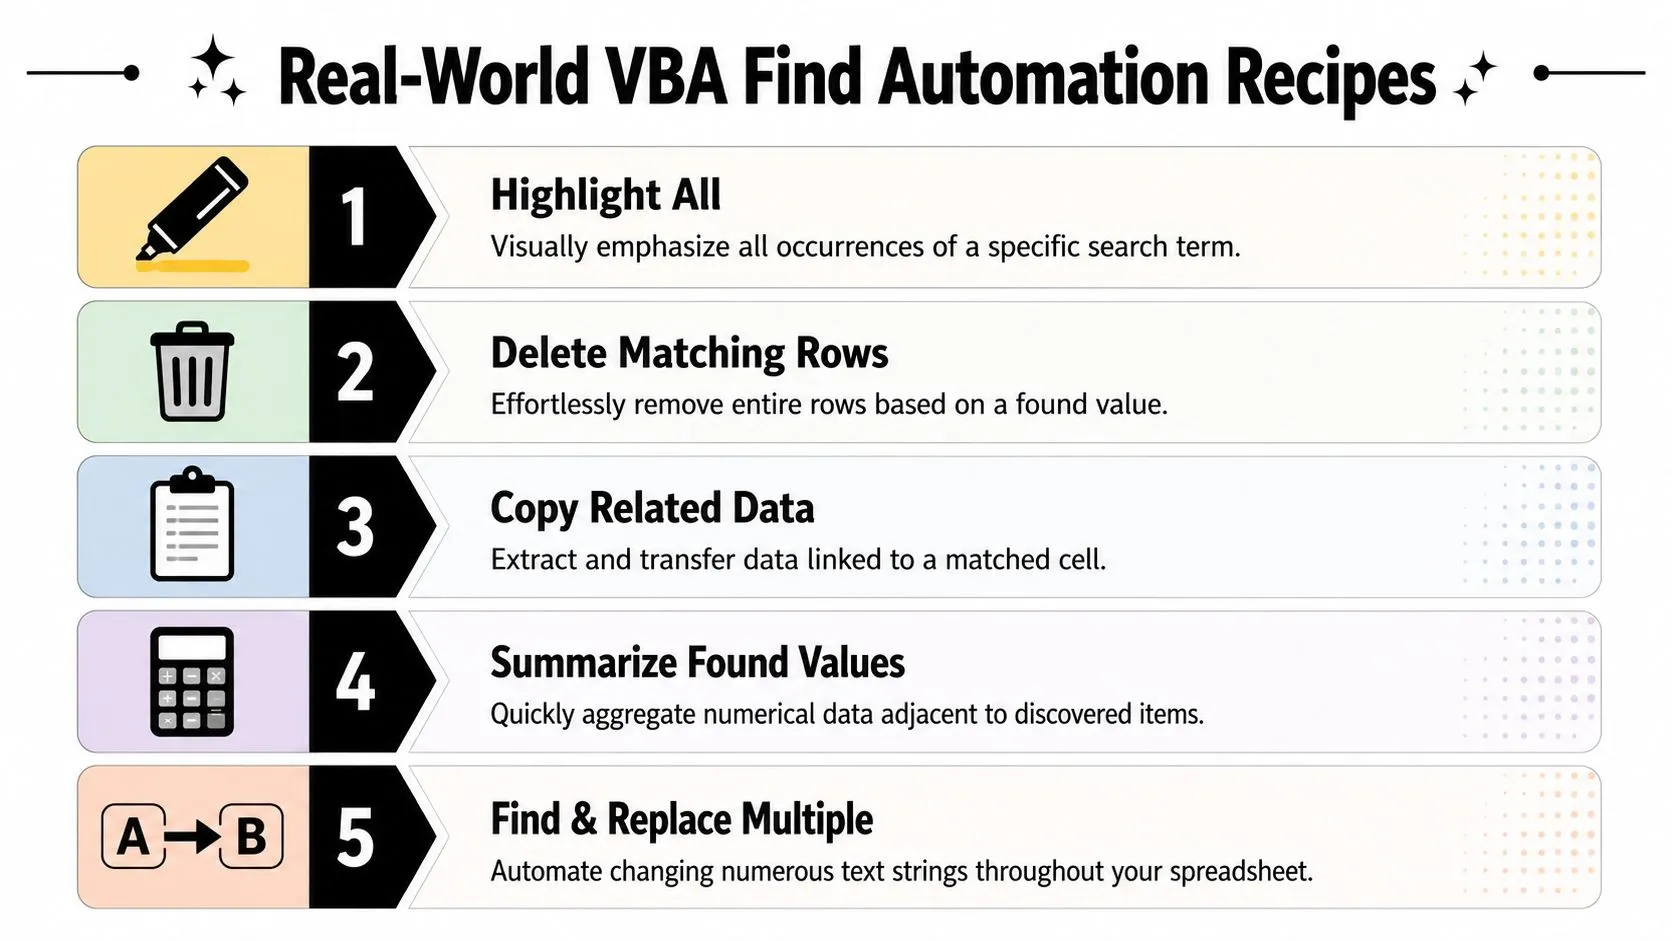
Recipe one highlight all matching statuses
This is a simple audit recipe for teams who need visual review fast.
Sub HighlightOverdueStatuses()

    Dim ws As Worksheet
    Dim searchRange As Range
    Dim foundCell As Range
    Dim firstAddress As String

    Set ws = ThisWorkbook.Worksheets("Tasks")
    Set searchRange = ws.Range("D2:D500")

    Set foundCell = searchRange.Find( _
        What:="Overdue", _
        After:=searchRange.Cells(searchRange.Cells.Count), _
        LookIn:=xlValues, _
        LookAt:=xlWhole, _
        SearchOrder:=xlByRows, _
        SearchDirection:=xlNext, _
        MatchCase:=False, _
        MatchByte:=False, _
        SearchFormat:=False)

    If foundCell Is Nothing Then Exit Sub

    firstAddress = foundCell.Address

    Do
        foundCell.Interior.Color = vbRed
        foundCell.Font.Color = vbWhite
        Set foundCell = searchRange.FindNext(foundCell)
    Loop While Not foundCell Is Nothing And foundCell.Address <> firstAddress

End Sub
Use this when someone needs a sheet they can review immediately, not a new tab or exported file.
A short video example can help if you prefer to see macro behavior rather than only read code.
Recipe two copy matching rows to a summary sheet
This recipe turns a found cell into a full-row extraction workflow. It's useful for client summaries, project packs, or issue lists.
Sub CopyClientRowsToSummary()

    Dim wsData As Worksheet
    Dim wsSummary As Worksheet
    Dim searchRange As Range
    Dim foundCell As Range
    Dim firstAddress As String
    Dim nextRow As Long

    Set wsData = ThisWorkbook.Worksheets("Data")
    Set wsSummary = ThisWorkbook.Worksheets("Summary")
    Set searchRange = wsData.Range("B2:B500")

    Set foundCell = searchRange.Find( _
        What:="CL-2048", _
        After:=searchRange.Cells(searchRange.Cells.Count), _
        LookIn:=xlValues, _
        LookAt:=xlWhole, _
        SearchOrder:=xlByRows, _
        SearchDirection:=xlNext, _
        MatchCase:=False, _
        MatchByte:=False, _
        SearchFormat:=False)

    If foundCell Is Nothing Then Exit Sub

    firstAddress = foundCell.Address

    Do
        nextRow = wsSummary.Cells(wsSummary.Rows.Count, "A").End(xlUp).Row + 1
        wsData.Rows(foundCell.Row).Copy Destination:=wsSummary.Rows(nextRow)

        Set foundCell = searchRange.FindNext(foundCell)
    Loop While Not foundCell Is Nothing And foundCell.Address <> firstAddress

End Sub
The useful part isn't the copy itself. It's that the code anchors on the found cell's row, so the same pattern can be adapted to any report where one column identifies the records you need.
Recipe three find a record and update the adjacent cell
This is the classic operational macro. Find a record. Mark the next column. Save someone from typing the update manually.
Sub MarkInvoicePaid()

    Dim ws As Worksheet
    Dim searchRange As Range
    Dim foundCell As Range

    Set ws = ThisWorkbook.Worksheets("Invoices")
    Set searchRange = ws.Range("A2:A500")

    Set foundCell = searchRange.Find( _
        What:="INV-10025", _
        After:=searchRange.Cells(searchRange.Cells.Count), _
        LookIn:=xlValues, _
        LookAt:=xlWhole, _
        SearchOrder:=xlByRows, _
        SearchDirection:=xlNext, _
        MatchCase:=False, _
        MatchByte:=False, _
        SearchFormat:=False)

    If foundCell Is Nothing Then
        MsgBox "Invoice not found."
        Exit Sub
    End If

    foundCell.Offset(0, 1).Value = "Paid"

End Sub
Three reasons this kind of macro works well in practice:
- It limits touch points: Users don't need to edit the whole row manually.
- It's easy to maintain: The business rule sits in one visible line.
- It scales cleanly: The same pattern can update approval flags, review notes, owner names, or exception markers.
If you're building these workflows with AI support, one practical option is AI Academy, which offers tutorials around ChatGPT for Excel, automation, and related workflow-building for non-technical professionals.
Writing Robust Code Performance Tips and Common Pitfalls
The biggest difference between a macro that “works on my machine” and one that survives real use is defensiveness.
Be explicit. Excel remembers search settings from prior Find operations, so leaving key arguments out is an easy way to produce inconsistent behavior later. That's why production code should always specify the search controls it depends on, even if the shorter version seems to work today.
Habits worth keeping
- Check for
Nothingearly: Don't touch.Address,.Row, or.Offsetuntil you know a match exists. - Bound the range: Search the actual data block, not the entire worksheet.
- Store the first address: That gives your
FindNextloop a clean stop condition. - Turn off visual overhead when needed:
Application.ScreenUpdating = Falsecan help longer loops feel more responsive, then turn it back on at the end. - Keep conditions readable: If your post-find logic gets messy, a clear branching structure helps. This practical guide to IF statements in Excel logic is useful when your macro starts applying different actions to different match types.
Reliable VBA usually looks a little more verbose than demo VBA. That's a feature, not a flaw.
The usual failures are predictable. People search the whole sheet, omit arguments, forget the Nothing check, or use Find when they really need a FindNext loop. Tightening those habits is what turns Excel VBA Find from a neat trick into a dependable automation tool.
If you want to get better at turning repetitive spreadsheet work into usable systems, AI Academy is a practical place to learn. It focuses on short, job-relevant tutorials for working professionals, including AI-assisted Excel automation, prompt workflows, and hands-on ways to build faster reporting and cleanup processes without wading through bloated theory.