You might be reading this because a robot just showed up in your world. Maybe your operations team bought a small wheeled kit for inventory experiments. Maybe a vendor demoed a desktop arm for packaging. Maybe you manage a process and keep hearing that automation is “easy now,” but every tutorial seems written for engineers.
That gap is evident. Most beginners don't need a graduate course in robotics. They need a clear path that explains what happens on the screen, what happens on the machine, and why a robot that looked perfect in a simulator can still drift, hesitate, or stop when it encounters its operational environment.
Getting Started with Robot Programming
A good first mental model is this. Programming a robot means telling a machine what action to take, when to take it, and how to react when the world doesn't match the plan. That could be as simple as “drive forward, turn, stop at the wall,” or as advanced as “pick up a part, avoid an obstacle, and place it accurately.”
Robot programming didn't start with modern AI tools. A foundational milestone came in 1961, when the Unimate, the first programmable industrial robot, was deployed and programmed with a teach pendant to record positions for die-casting work in automotive manufacturing, according to this history of early robot programming. That matters because the basic idea still survives today. A person defines positions and movements, then the controller repeats them reliably.
For a non-technical professional, the starting kit is usually modest:
- A computer: A laptop or desktop where you'll write and run code.
- A robot or simulator: A wheeled kit, a desktop arm, or a virtual environment.
- A connection method: Often USB for simple kits, sometimes Wi-Fi or Ethernet on more advanced systems.
- Basic programming comfort: Python is a practical starting point because many beginner robotics libraries use it.
- Patience for testing: Robots don't just run code. They run code in physical space.
Practical rule: If you can follow a spreadsheet formula, troubleshoot a browser issue, and copy a code snippet into an editor, you can learn how to program a robot.
Most readers get stuck on one question early: “Do I need to understand all the math first?” No. You need enough structure to think in steps. First define the task. Then define movement. Then test. The deeper math becomes useful later, especially for robotic arms, but it isn't the barrier many people think it is.
Choosing a Robot Platform or Simulator
Your first decision shapes everything else. If you choose a platform that's too advanced, you'll spend your time fixing setup issues instead of learning. If you choose one that's too limited, you may outgrow it fast.
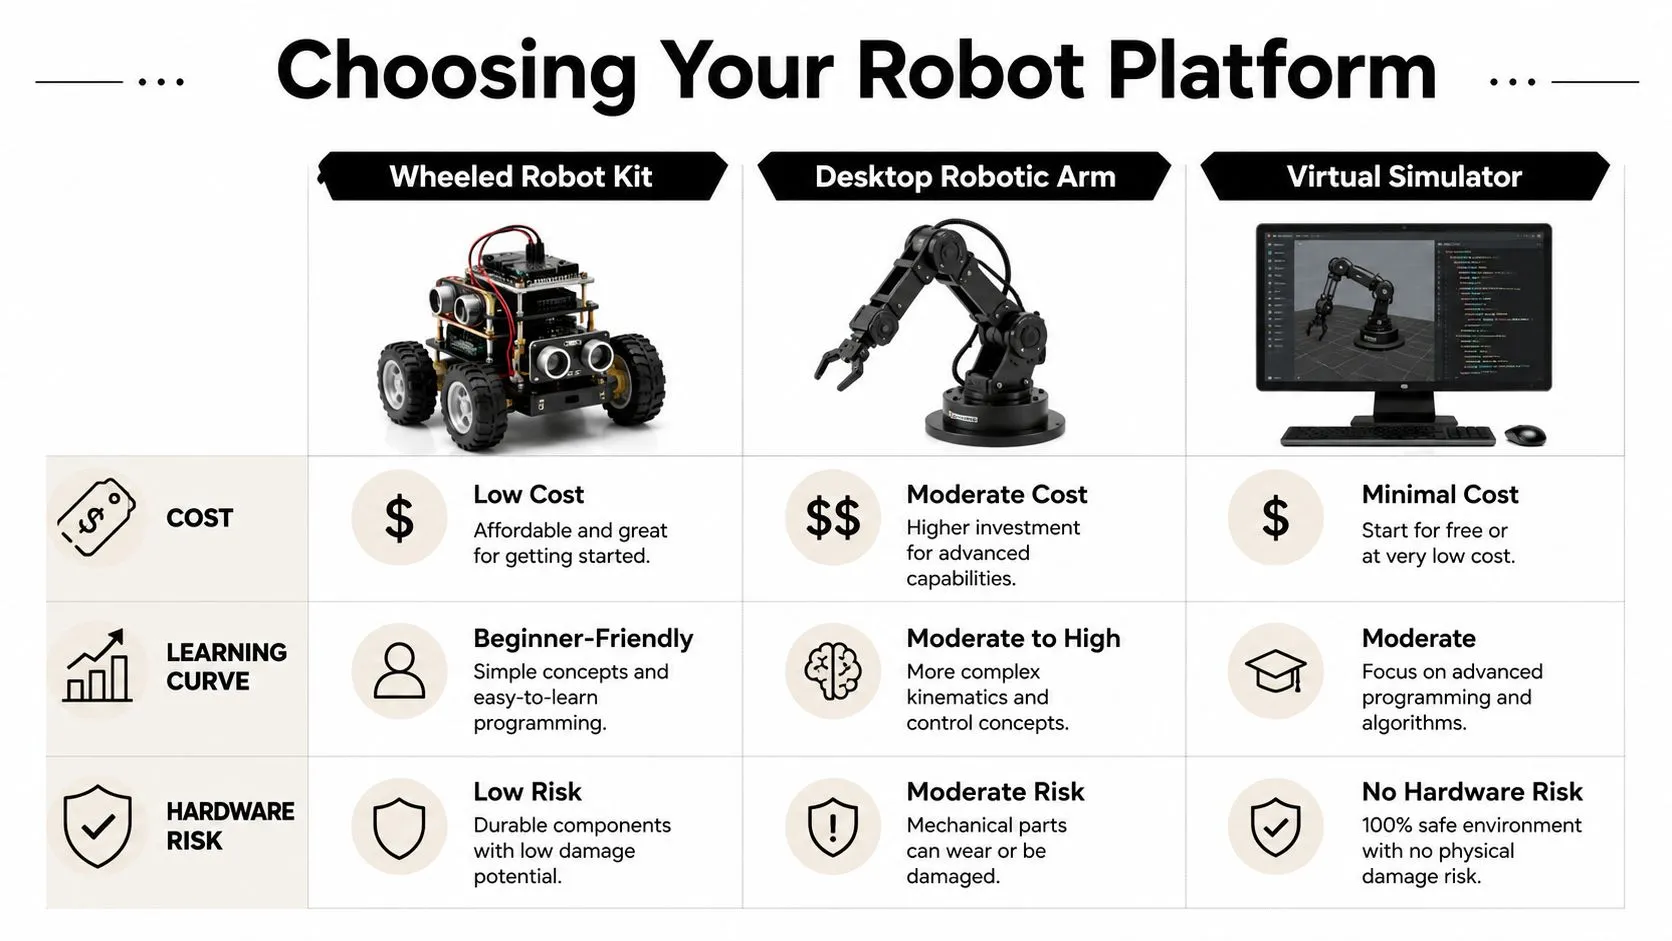
Here's the simplest way to think about the main options.
| Platform | Best for | Strength | Watch out for |
|---|---|---|---|
| Wheeled robot kit | First-time learners | Easy to see cause and effect | Turning accuracy can be messy |
| Desktop robotic arm | Small automation experiments | Feels closer to industrial tasks | Motion logic is harder |
| Virtual simulator | Safe practice and planning | No hardware risk | Can hide real-world calibration issues |
A wheeled robot kit is often the friendliest starting point. You write a few lines of code and immediately see motion. Forward, backward, turn left, stop. That feedback loop is motivating, especially for marketers, analysts, and managers learning on the side.
A desktop robotic arm makes sense if your job is closer to packaging, sorting, or pick-and-place work. It introduces concepts like joint motion and tool position earlier. That's useful, but it also raises the difficulty because arm motion isn't as intuitive as wheel motion.
A virtual simulator is the safest option when you want to learn logic before touching hardware. Many teams begin there because simulation lets them practice sequences, layout, and collision thinking without risking a real machine. If you want to build confidence with 3D environments first, this course on creating 3D simulations with Claude can help you get comfortable with simulation-style thinking.
The broader market shift helps explain why beginner-friendly options are easier to find. The collaborative robotics market was projected to reach $1 billion in revenue by 2020, with over 40,000 cobots entering industry, according to Robotiq's robotics statistics roundup. In plain terms, robots moved beyond heavy industrial cages and into more accessible settings.
Start with the platform that matches your job problem, not the one that looks most impressive in a demo.
Setting Up Your Development Environment
You sit down to program a robot for the first time, open your laptop, plug in the device, and nothing happens. The robot is fine. The missing piece is usually the workspace on your computer.
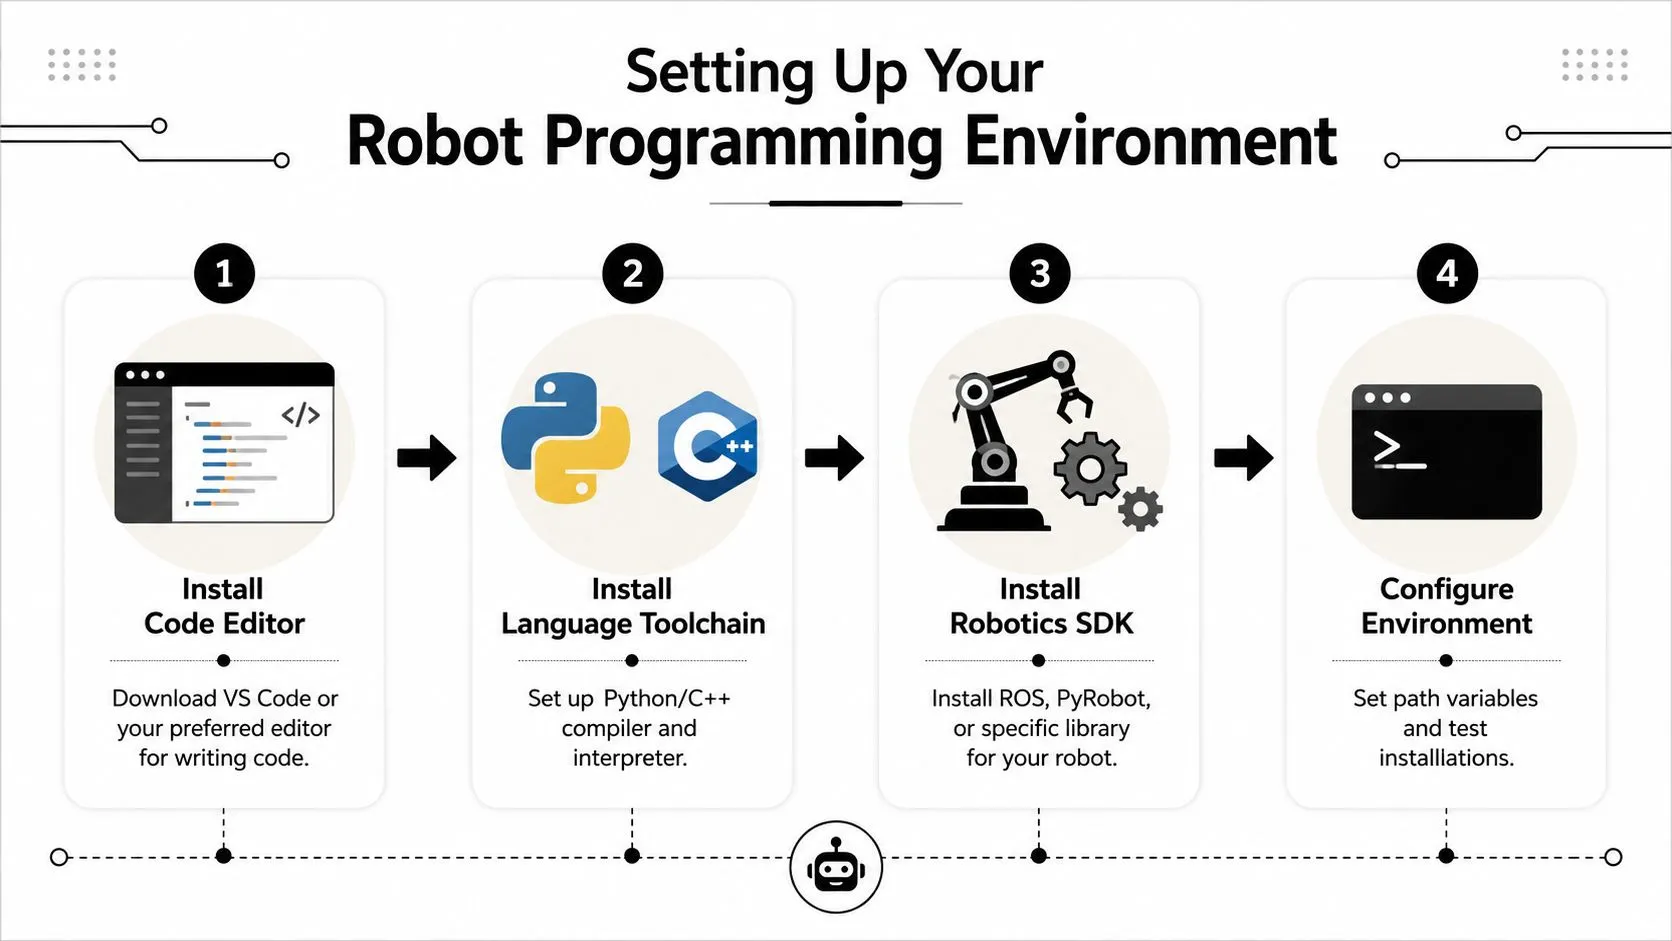
A development environment is the robot equivalent of a workbench. It gives you a place to write code, install the right tools, test small pieces, and confirm your computer can communicate with either a real robot or a simulator. For non-technical professionals, this step often feels harder than writing the first commands because setup problems look mysterious at first.
Install the essentials
Start with a code editor such as Visual Studio Code. It is approachable, widely used, and works well for Python and C++.
Next, install the language tools that match your robot platform:
- Python: A practical default for beginner kits, classroom robots, and many simulator projects.
- C++: More common in performance-focused robotics systems and some ROS workflows.
If you are learning on a computer where local setup still feels unfamiliar, this guide to running AI models locally on your computer can help you get more comfortable with terminals, dependencies, and environment setup. Those are the same habits that make robot programming less frustrating.
If your robot vendor provides its own app, SDK, or simulator, install that too. Hardware robots and simulators often share the same basic setup pattern, but simulators usually skip the extra layer of USB drivers and device permissions. That makes them a good training ground when you want to learn the software side first.
Verify your setup before connecting hardware
Begin with a tiny test, not motion.
A good first check is a file that imports the robot library and prints a short message. You are confirming that the editor, interpreter, and installed packages work together before you add motors, batteries, cables, and safety concerns.
Use this order:
- Create a new project folder in your editor.
- Install the library or SDK recommended by the robot maker or simulator.
- Write a small test file that imports the library.
- Run the file in the terminal and confirm there are no import errors.
- Connect the robot only after that and test whether the computer can detect it.
That order matters. If you connect hardware too early, you can end up guessing whether the problem is your code, the cable, the driver, or the robot itself.
Know the four setup problems you will hit first
Beginner setup issues usually fall into a few predictable categories:
- Driver issue: Your computer cannot talk to the controller, USB device, or serial port.
- Permission issue: Your operating system blocks access to the hardware interface.
- Path issue: The package installed, but your active environment cannot find it.
- Version mismatch: The robot library expects a different Python version than the one you installed.
A simulator helps here because it removes some hardware variables. A physical robot teaches the full workflow, but it also adds more places for communication to fail. Simulators are like flight trainers. Real robots are like actual aircraft on the runway. Both matter, but they teach different parts of the job.
A robot that appears unresponsive often has a setup problem on the computer side.
One more habit will save time later. Keep a simple setup note in your project folder with your Python version, installed packages, driver steps, and the exact command that successfully ran your test. When something breaks a week later, you will not have to rebuild the whole environment from memory.
Creating and Running Your First Programs
Robot programming starts to feel real. Your first successful program shouldn't be clever. It should be boring and predictable.
Start with simple motion
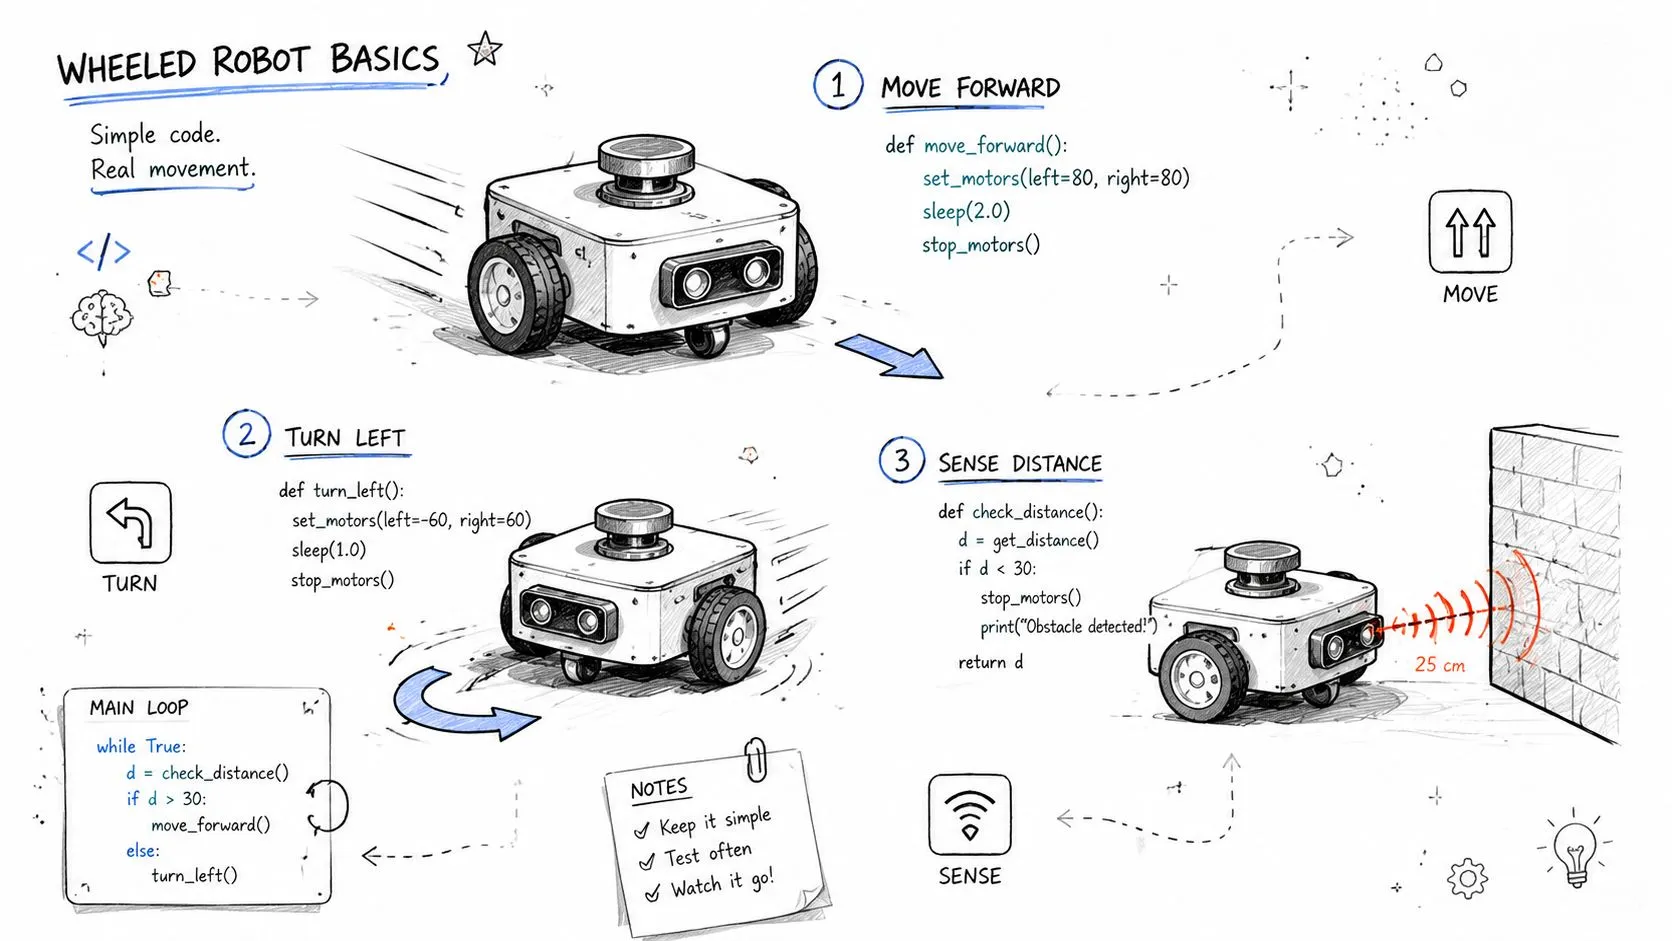
Suppose you have a wheeled robot with a Python library that exposes functions like forward(), turn_left(), and stop(). Your first script might look conceptually like this:
robot.forward()
sleep(2)
robot.turn_left()
sleep(1)
robot.stop()
What each line means in plain language:
robot.forward()tells the motors to move ahead.sleep(2)waits so the robot keeps doing that action briefly.robot.turn_left()changes wheel behavior to rotate.robot.stop()cuts motion.
That's enough for a first run. You're learning the command pattern: issue action, wait, issue next action.
For a robotic arm, the pattern is similar even though the commands differ. Instead of “forward,” you might send the arm to a named position such as home, approach, or place. The principle stays the same. You define motion as a sequence, not as one giant block of magic.
Add a sensor check
Once motion works, add a simple condition. For example, read a distance sensor and stop if the robot gets too close to an obstacle.
Conceptually:
distance = robot.read_distance()
if distance < limit:
    robot.stop()
else:
    robot.forward()
This is the moment where a robot stops being a remote-control toy and becomes a system that reacts to input.
Many tutorials stop here and make it look like turning should now be perfectly accurate. That's misleading. As discussed in this community explanation of turning accuracy and sensor fusion, beginner content often skips the practical need for calibration and multiple sensors when you want precise turning. If your robot “turns too much” or drifts, that doesn't mean you failed. It often means the hardware needs better calibration or additional sensing.
If the code says “turn” and the robot turns inconsistently, check the robot before blaming yourself.
Here's a practical progression that works better than trying to program everything at once:
- First run: Make the robot move and stop on command.
- Second run: Add one turn and measure what happens.
- Third run: Read one sensor and print its value repeatedly.
- Fourth run: Combine movement with one sensor-based rule.
If you want a beginner-friendly example of turning an idea into a working interactive build, this tutorial on building a custom desktop pet without coding skills using Codex is useful because it strengthens the same habit of breaking behavior into small, testable pieces.
Move from simulation to hardware
If you started in a simulator, run the same logical sequence there first. Watch the path. Confirm the order of actions. Then move to hardware and expect some differences.
Common transition problems include:
- The robot connects in software but won't move
- The motor directions are reversed
- The robot overshoots turns
- The sensor values fluctuate more on the physical device
A short demo can help you compare your expectations with actual motion. Use this as a visual reference after your first tests.
Debugging Techniques and Safety Best Practices
A robot that looked perfect in software can still bump a chair leg, miss a turn, or stop for no clear reason the first time it runs outside of simulation. That surprises many first-time builders. The reason is simple. Programming a robot is never only about code. You are also dealing with motors, sensors, timing, surfaces, and people nearby.
Start with what the robot believes
If the robot acts oddly, check its inputs before rewriting your whole program. A robot behaves according to the information it receives, even when that information is wrong. A distance sensor that flickers or an encoder that miscounts can make good code produce bad motion.
A useful analogy is a driver following a faulty GPS. The driver is not confused. The directions are.
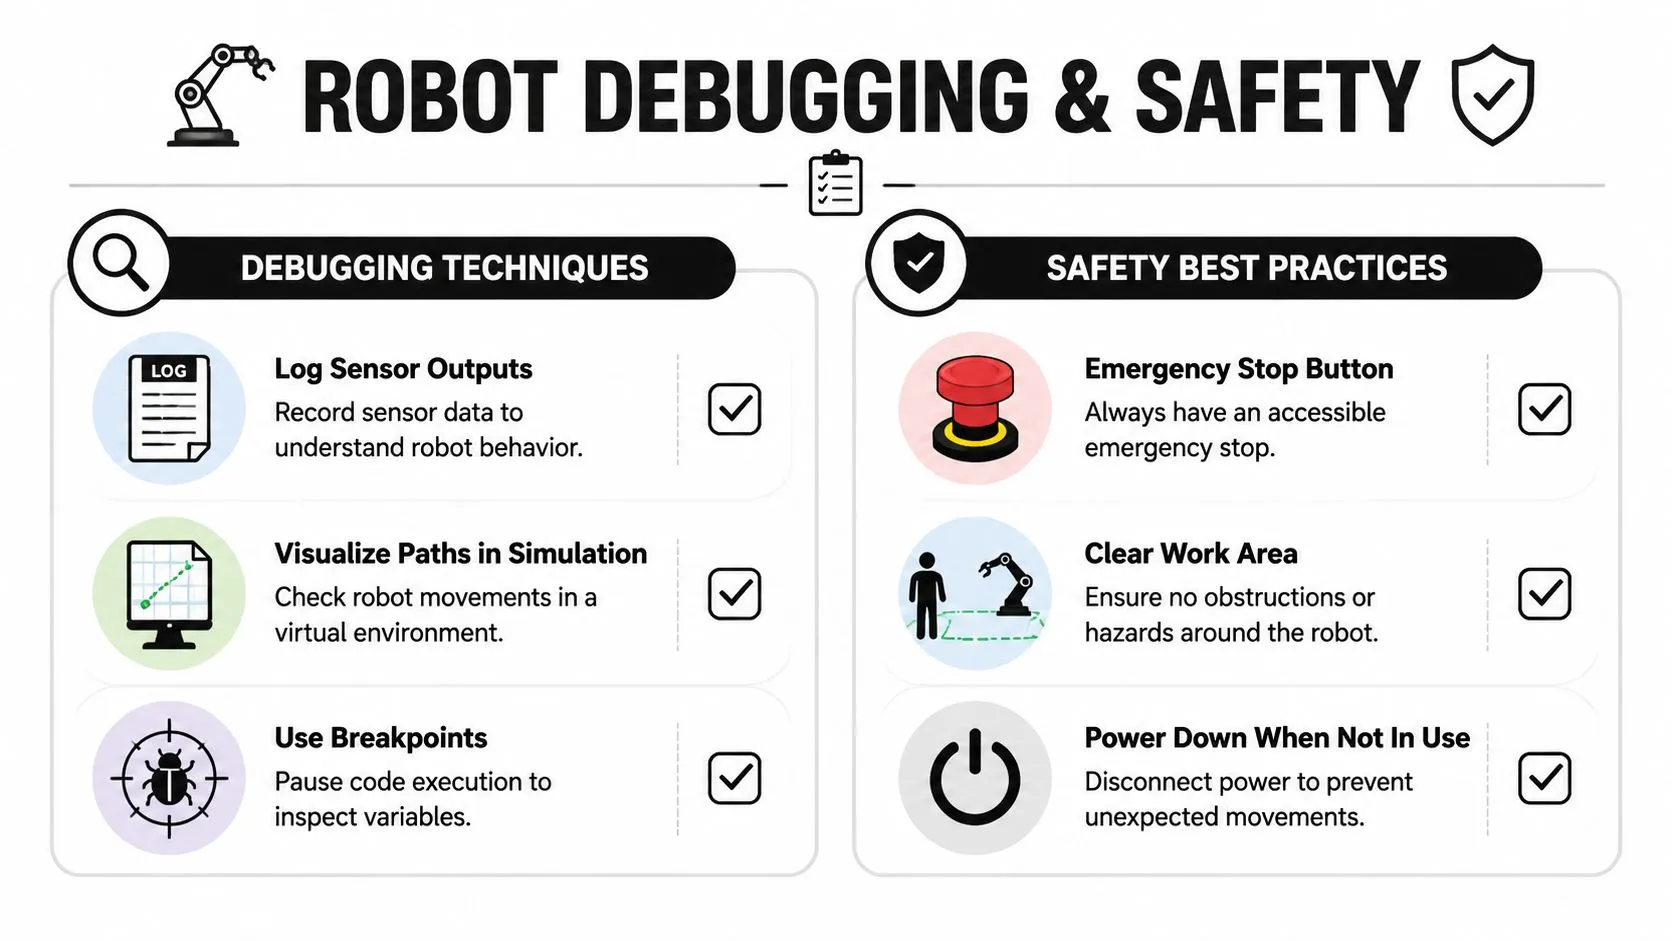
Use this sequence when you debug:
- Read the sensor values live. Print distance readings, encoder counts, button states, or camera detections while the robot runs.
- Check one assumption at a time. If the robot should stop at 20 cm, confirm it is reading 20 cm before testing the stop rule.
- Pause before motion commands. Use breakpoints or short delays to inspect variables right before the next action.
- Replay the path in a simulator. If the virtual robot behaves correctly but the physical robot does not, the gap is often in calibration, friction, wiring, or sensor noise.
- Shrink the test. Run one turn, one stop, or one pickup step instead of the whole routine.
Drift during a turn is a good example. The command may be correct, but the floor may be slick, one wheel may grip more than the other, or the timing may only work on your desk. That is why simulators are helpful but incomplete. They are flight simulators for robotics. They teach logic well, but they cannot fully recreate a loose cable or a dusty floor.
Build safety into the test itself
Safety is part of programming because every bug becomes a physical action. A wrong value in a spreadsheet stays on a screen. A wrong value in a robot can move an arm, spin a wheel, or close a gripper.
Use a repeatable pre-run routine:
- Clear the area. Remove bags, tools, cords, and anything the robot could hit or drag.
- Use the slowest practical speed. Slow tests give you time to notice bad behavior before it becomes a bigger problem.
- Know how to stop it immediately. That may be an emergency stop, a kill switch, unplugging power, or a software stop command you have already tested.
- Stand where you can see the full motion path. Blind spots create surprises.
- Watch the first full cycle from start to finish. Stay with the robot until you have seen the whole behavior once.
- Shut down cleanly after the test. Do not leave motors active by accident.
As noted earlier, industrial robot teams put a lot of emphasis on reduced-speed validation and path checks for a reason. Many early failures come from assumptions about clearance, timing, or I/O signals that were never verified on the actual machine. That same lesson applies to a small wheeled robot on an office floor or a training arm on a lab bench.
A simple debugging habit that saves time
Keep a short test log.
After each run, write down three things: what you expected, what happened, and what you will change next. This sounds basic, but it prevents the common beginner loop of changing five variables at once and then not knowing which one mattered. It also makes handoff easier if your role is in operations, training, product, or project management rather than engineering.
Teams that learn well often use short, focused training formats for this kind of repetition. If you are teaching robot safety or debugging to mixed-skill staff, these platforms for narrative micro-lessons show why short scenario-based practice works so well.
Use one rule for every first run: go slower than feels necessary, watch closely, and trust evidence from the robot more than your guess about what the code should do.
Exploring Next Projects and Learning Paths
Your first successful robot program changes how you see automation. Tasks that once looked mysterious start to look procedural. A report can be automated. A warehouse route can be tested. A pick-and-place motion can be broken into positions and checks.
Good projects after your first success
Choose a project that adds only one new idea.
- Line following: Good for learning feedback loops.
- Obstacle avoidance: Good for combining movement and sensor rules.
- Object detection: Good for introducing cameras and simple perception.
- Pick and place: Good for learning sequences, positions, and tool control.
If you move toward robotic arms, you'll quickly hit a gap that many tutorials ignore. As raised in this discussion about straight-line motion and inverse kinematics for 6-axis arms, beginner guides often show simple 2D robot motion but skip the software flow and IK steps needed to move an arm tip along a straight path. That's one reason many non-technical professionals feel confident with wheeled bots but get stuck with arms.
How to keep learning without getting lost
A good learning path gets progressively more physical and more precise.
| Stage | Focus | What you're learning |
|---|---|---|
| Early | Simple scripts | Commands, timing, conditions |
| Middle | Simulation and sensors | Validation, debugging, feedback |
| Later | Arms and planning | Coordinates, path segments, IK concepts |
Some people learn best through long courses. Others keep momentum better with short lessons they can finish during a work break. If that sounds more realistic for your schedule, browsing platforms for narrative micro-lessons can help you find formats that make technical topics less overwhelming.
Community also matters. Forums, maker groups, and robotics subreddits are useful because they expose you to the problems polished tutorials skip. You'll learn faster when you see real debugging stories, not just perfect demos.
Keep your next project small enough that you can finish it. Finished robots teach more than ambitious half-built ones.
If you want a practical way to build automation skills alongside robotics thinking, AI Academy is worth exploring. It's built for non-technical professionals who want short, hands-on lessons they can apply at work right away, especially when you're learning how software, workflows, and AI tools fit together.